

Club Coaching

Once you have achieved your Club Pilot rating from your School, you may feel that you need an extra bit of Coaching to ease you into Club flying. This can be done by getting in touch with our Club Coaches who can help you with suitable advice and site knowledge. If the weather is looking suitable for flying at Dunstable, contact the Coaches (via Telegram) to check who will be on-site. Remember, if you are under 10hrs airtime you must always speak to a Coach on-site before flying.
We leave it entirely up to you to get in touch with us.
Low Airtime Coaching Information
Red ribbon pilots fresh from Training School take note. Dunstable is technically a difficult site and unsuitable for coaching nervous zero hours pilots fresh out of the training school. Try and get some airtime at another easier site (possibly the sites you trained on), before coming here. You will find flying our site a bit easier afterwards.
Try to stay current and get out flying as much as you can in the first year after leaving the School. We see so many low airtime pilots turn up at Dunstable, struggle to fly for a few visits, and then they disappear never to be seen again. Dunstable is a difficult site to fly - but stick with it and master it. It will make you a better pilot.
The main Club Coaching done within our Club is simply to come out flying on the hill, with either the Club Coaches themselves, or talking and flying with more experienced pilots. When you turn up ask for a Club Coach and explain that you are new to the site and maybe need a bit of help. Tell the Coach your experience in hours airtime and the last time you flew. Remind the Coach if you are flying the site for the first time.
Read through the coaching sections below, 'The Launch and the Fence', 'The First Third' and 'How wind direction affects flying the ridge at Dunstable', and especially 'Danger Days', these will give you valuable insite on flying here at the Downs. If you are at all unsure about any aspect of the advice given - ask a Coach on the hill.
When you first arrive on site
We presume you have thoroughly read the Dunstable Site Guide and know the various launching and landing areas. Yes, we know everyone is taking-off at the main paraglider launch in front of the fence, BUT - is that the best place for you to launch from?
Spend at least 20 minutes just looking around the site itself, look where the experienced pilots are flying in relation to the ridge - how they launch - where they launch - how they top land. Check the windsocks in the Gliding Club, is the wind off to the North or the South? Which way should you turn after launch? How will that affect your groundspeed?
Also look at the sky. What are the clouds telling you? Are they flat and layered or towering up into the blue sunny sky with crisp edges. What are the birds doing? Are there flocks of them all circling at once? Are some pilots in the air much higher than others? These are obvious indications of thermals on the hill. Watch and Learn!
All this visual information can give you advanced warning of what the air is going to be like, even before you take-off. Finally, make sure YOU are ready to fly, and that you are well rested after your stressful drive to the site, and above all remain focused on what you are about to do.
Finally a word of advice…forget the GoPro's, cameras and the selfie-sticks, concentrate on just your flying. Leave all that tech on the ground for when you have more flying experience.
Remember: Pilots with less than 10 hours need to discuss their flight plan with a Club Coach on site before flying. Please remember that Coaches also want to fly, they don't need to waste an hour on the ground waiting for you to pre-flight your harness and wing, get all that stuff sorted beforehand, then ask for help.
Make sure you have a Flight Plan.
What exactly do you want to achieve with your first flight? Do you want to do a straight top to bottom or maybe soaring above the hill and a top landing? Don't be too ambitious with early flights at the Downs, it's a technically difficult site to fly and you may end up going down to the bottom field on your first few flights. We have all learned that way, every single pilot you see effortlessly flying the hill has been through the same situation as you are now in. Digest all the visual information you collected earlier, ask questions with the Coaches if needed and finally, plan it in your head before you launch and above all stick to your Flight Plan!
At some point you will be wanting to take-off from the main paraglider launch in front of the Club car park. The dreaded fence seems to be a major obstacle for some low airtime pilots, but with good technique it will become a lot easier.
The next article below gives some good advice… now read on.
The Launch and the Fence!
Coaching tips for low airtime pilots launching over the Fence
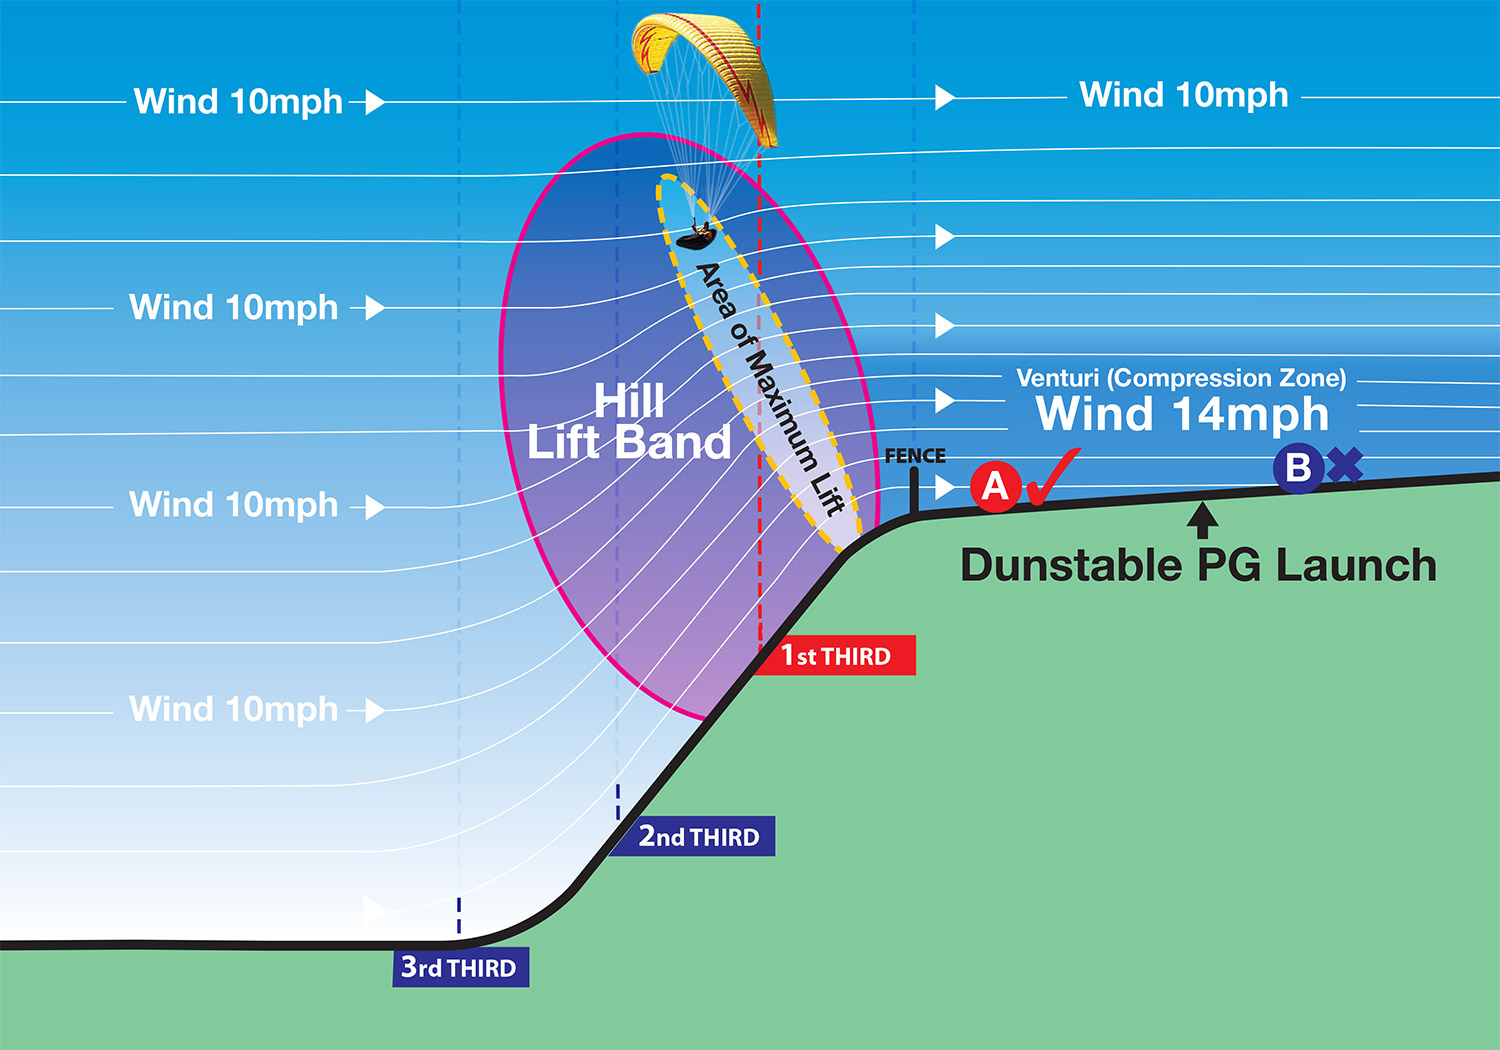
The majority of low airtime pilots we see at Dunstable, have difficulty launching over the Fence because they get the ground-handling all wrong. Their ground-handling skills are lacking practice and polish. Most of these pilots pull up the wing, turn and just pull on the brakes expecting to launch into the air and fly. This may happen at other sites you visit (Combe Gibbet / Devils Dyke) where the launch point is inside the hill's lift band, but Dunstable is completely different, our main launch is outside the hill's lift band. Take a close look at the diagram.
The Hill Lift Band
The main paraglider launch in front of the Club car park is fairly flat and set back away from the hill slope (see the images). Subsequently, it is outside the lift band of the slope. There is a stronger compression wind here. You will only get ridge lift once you cross over the fence and fly into the actual lift band. If you sink down the hill after a poor launch the lift band gets progressively weaker the lower you go down the slope, thats why you have difficulty ridge soaring half way down the hill!
The Venturi (compression) wind coming over the crest of the hill has a lot of horizontal component to it, making moving forward in any strongish breeze fairly difficult. So in a steady 10mph breeze the actual windspeed on the launch might be 14+mph, and possibly 20+mph if strong thermals are coming through. So make sure that you launch fairly near the fence (Point A). This gives a better chance of a successful launch.
Remember to keep your hands well up and not to apply the brakes, you will get only get dragged backwards or prematurely launch into the air and then go backwards! For the same reason do not launch too far back from the fence (Point B), as mistakes can soon get out of control and you will get dragged backwards towards the wooden posts, cars and onlookers!
For a successful launch you need three things… SPEED, SPEED and more SPEED!
How it's done
The technique is to get your launch speed correct. Keep your hands / brakes well up and really lean forward whist running towards the fence. Plenty of speed as you approach the fence, a big final push off with your feet, then dab both brakes a touch as you cross over the fence and this then converts your speed to lift*, to help you clear the fence. (* The Speed Squared Law: double your speed and lift increases four times - treble your speed and the lift increases nine times!)
There is no hill lift on the launch side of the fence.
Do not just pull on the brakes, you will just go up and backwards, and then come down and collide with the fence. You will only gain height after you clear the fence! If you do take-off too slow and manage to scrape over the fence, (usually by stepping on it), then you will either drop into the gulley and get rotor from the trees as you sink rapidly halfway down the hill, or immediately land again in the gorse bushes on the other side of the fence.
We will now look at actually flying the hill (assuming that you have successfully cleared the fence) and where to fly in order to actually stay up and soar the hill. You now switch instantly from 'Launch Mode' (getting over the Fence) to 'Flight Mode' (staying up on the hill) using a technique I call: The First Third.
The diagrams and advice given here is ONLY for wind speeds of around 10mph or less.
This windspeed is probably the most you would want to fly in for your first few flights at the Downs.
Note: As the wind speed increases above 12mph, the Lift Band of the hill gets larger and therefore, the "First Third / Magic Area' expands out with it. You must adapt the advice about flying the 'First Third' and you should fly a bit further out away from the hill, otherwise you could be blown backwards towards the road!
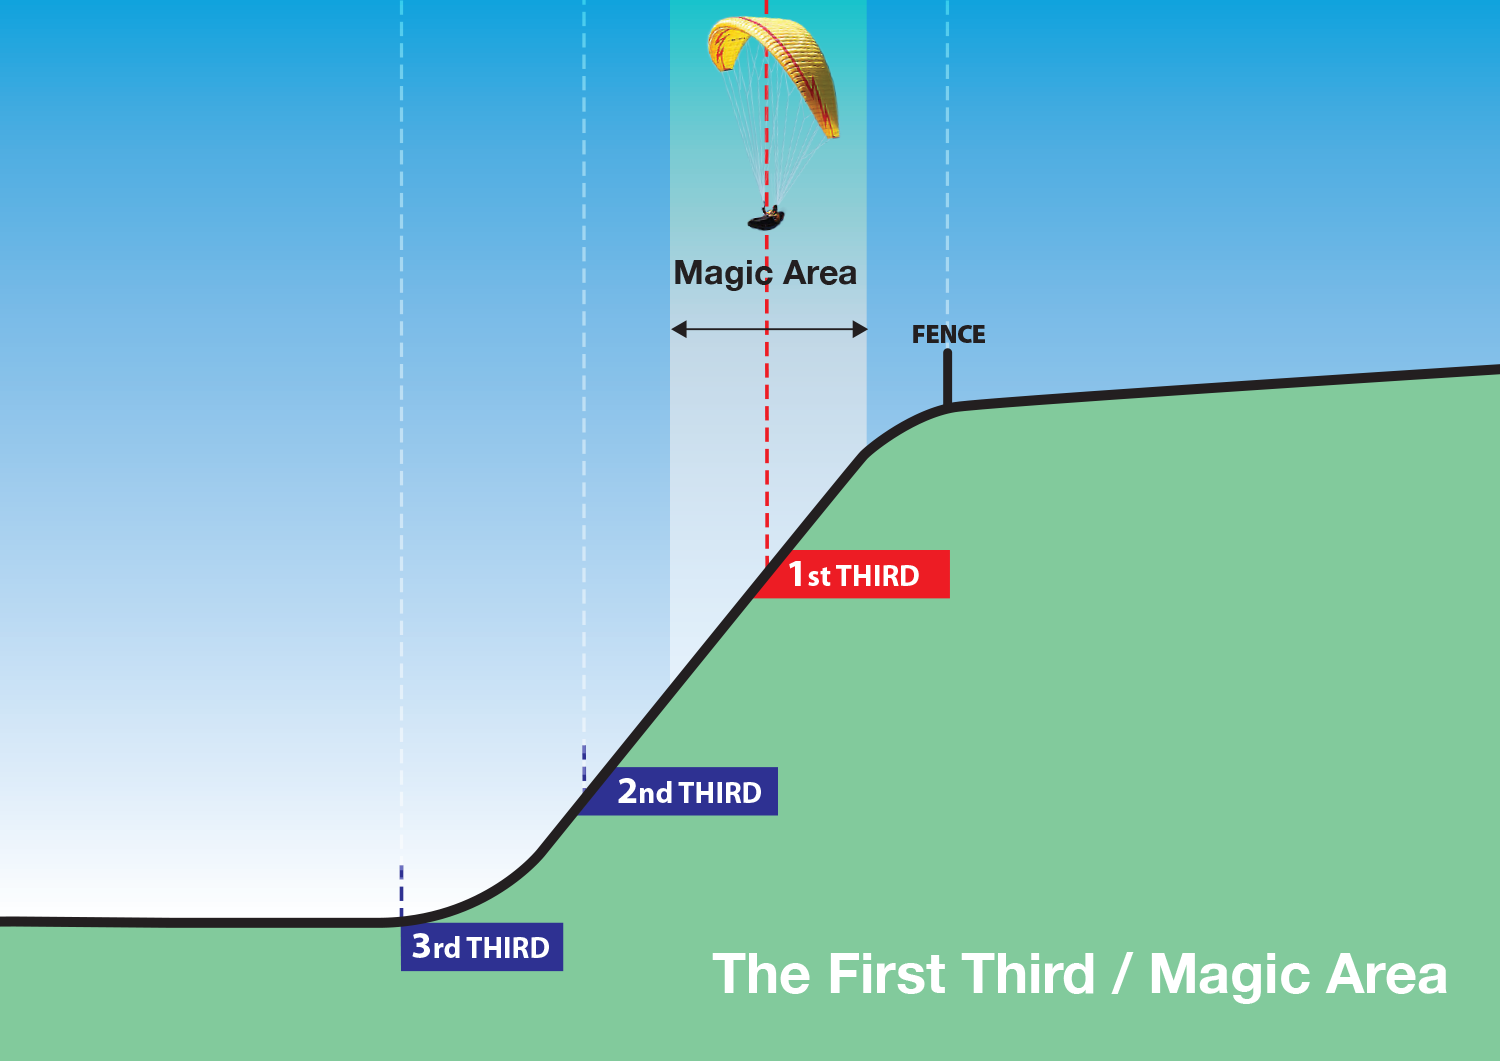
The Magic Area: Look at the image above, If we take the hill and divide it into thirds, with the top third starting at the fence on launch and the bottom third at the base of the hill, we can see that the optimum lift band for soaring the hill will be roughly centered over the First Third (where the hill is steepest). This I call the 'Magic Area' - and if you stay within this area you are guaranteed to stay up, depending on a reasonable wind speed of course!
The First Third & Magic Area explained

How it's done.
- Start turning right straight after your launch, you need to follow the Red arrow (A) and be flying above, and slightly in front of the trees to the right of the main launch. This puts you directly over the First Third. Do NOT fly behind those trees, as you are in their wind shadow and there will be no ridge lift!
- If you launch too slowly or fly straight out away from the hill for too long, then you will sink down the slope following the Blue dashed line (B) and you will be between the second and third 'Third' halfway down the hill. You will also be near the bottom of the hill's lift band (see the diagram in the 'Launch and the Fence' article above). If you try and ridge soar that far down the hill - I guarantee that you will be in the trees! The best option is to bottom land and try again, this time concentrating a bit more on your launch speed.
- To maintain your height on the 'First Third' when you turn back to fly along the ridge again, do a "Figure of Eight' turn, where you turn more than 180 degrees so that you are back over the steepest part of the hill. IMPORTANT: Always make your turn by flying AWAY from the Hill, NEVER make your turn towards the Hill!
- When you have enough height above take-off you can explore along the ridge a bit further, or even contemplate a top landing.
Stronger wind flying for low airtime or new pilots at Dunstable
Strong wind advice for flying the ridge and avoiding the Rotor
Remember the advice given in the above article "The First Third" is mainly aimed at pilots flying at Dunstable for their early flights in light wind speeds of about 10mph and under.
So what do you do if the wind starts to increase whilst you are flying, or you are now confident enough at launching in higher wind speeds and soaring the hill. What should you do to keep safe by avoiding the rotor and make the correct decisions?
If the wind does pick up to 15+mph while your in the air, you must stay well out away from the hill in order not to get blown backwards into the Golf Course. In those situations you will still be in the Lift Band when you are over the Gliding Club perimeter fence!
When flying at Dunstable, all pilots should be well practised at using Speed Bar and Big Ears in order to escape being blown backwards!
If you do end up being blown backwards into the Golf Club or the behind the bowl, then you are at fault for not seeing the danger beforehand, and your decision making needs re-thinking. Having a flight plan doesn't stop the minute you have taken off, it continues all through your flight!
Look down at the ground, are you moving forwards with your brakes fully off and your hands up? If you're not, it's time to bottom land! Beware of top landing if you are being blown backwards as the Top Landing area is in the hill's compression zone, you must quickly use 'Big Ears' to lose height, and fly out to bottom land.
IMPORTANT - DANGER! The Pimple / Bowl and strong winds
If the wind speed picks up while you are in the air do not fly behind the walkers path along the top of the Downs, especially near the Bowl. The Pimple / Bowl can get really nasty in strong winds, as the wind is swirling around the Bowl low down, as you would expect. The Venturi Compression wind over the crest of the ridge can be so strong that even full Speed Bar and Big Ears will not save you from going backwards over the houses and powerlines behind the road.
- Experienced pilots always fly further forwards out in front of the ridge in strong wind
- Remember…NEVER fly at the back of the Bowl in strong winds, there is no escape route!
- Don't fly behind the walkers path on top of the hill in strong winds, always move forward.
- Never make any turns towards the Hill, ALWAYS turn away from the Ridge.
How wind direction affects flying the ridge at Dunstable
Dunstable can take quite a large variation in wind direction, all the way from Southwest through to Northwest and we will discuss each direction in turn.
For the low airtime pilot knowing where to fly in different wind directions is just as important as learning how to fly the hill. Being on the correct part of the hill will make soaring the ridge so much easier. The best wind direction for inexperienced pilots is WestSouthwest to WestNorthwest. When the wind is more off to the Southerly or Northerly extremes then the site becomes much more difficult to fly, and more experience is required to fly the ridge.
SOUTHWEST WINDS: When the wind is off to the Southwest the ridge from the main paraglider launch all the way to The Pimple 'Bowl' is the place to fly. The various gulleys along that part of the hill can give good lift due to thermals/wind coming up them. Whichever way the wind is coming from, either the South or North, then the wind-facing side of the gulley will give lift.
Remember, do not fly in the Bowl if the wind is strong enough to stop you flying forwards - so check your groundspeed!
One important point to remember, if the wind has a lot of South in it when taking off at the main launch, and you then turn right towards the Bowl, you will be flying downwind as well as being fairly low over the bushes in order to stay on the 'First Third' - this will test your skill. Always have a 'Plan B' option to be able to turn out from the hill and bottom land safely.
 Click on the image to enlarge
Please Note: Wind directions and site conditions may change during the course of the day, especially when a warm front is approaching and the wind 'backs' towards the south. Pilots should check the windsocks in the LGC for an indication of wind direction and re-assess your flight plan accordingly.
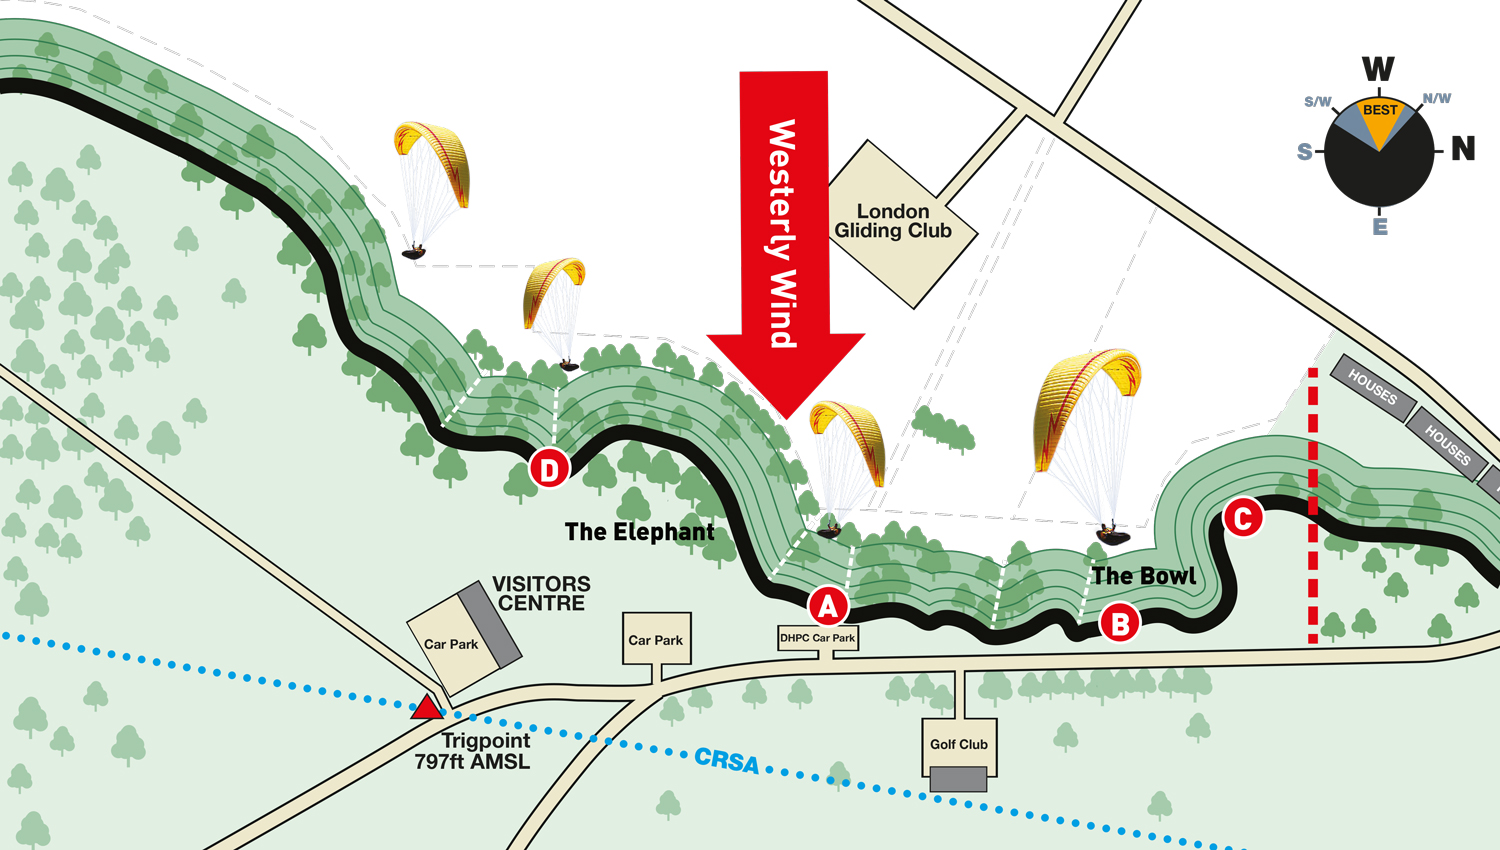
WEST WINDS: When the wind is Westerly the ridge is flyable all the way along from the Pimple 'Bowl' all the way down to the White Lion at the Zoo. Again various gulleys along the ridge can give good lift due to house thermals/wind coming up them. However, beware of being trapped in these gulleys if the wind picks up, as you will be rapidly blown backwards towards the road. If the wind does increase whilst you are flying - do not fly behind the walking path that runs along the top of the hill!
Always stay well out in front of the ridge when flying in strong winds!
In order to get to the southern part of the ridge, gain height to the left of the main paraglider launch and then fly over the 'Elephant' as fast as you can, as this part of the hill faces N/W and gives limited ridge lift in a west wind. Using speedbar can help. Once on the southerly face of the 'Elephant', that should give you enough lift to jump the gulley at the old northwest hang-glider take-off, over to the main ridge and continue along to the White Lion.
 Click on the image to enlarge
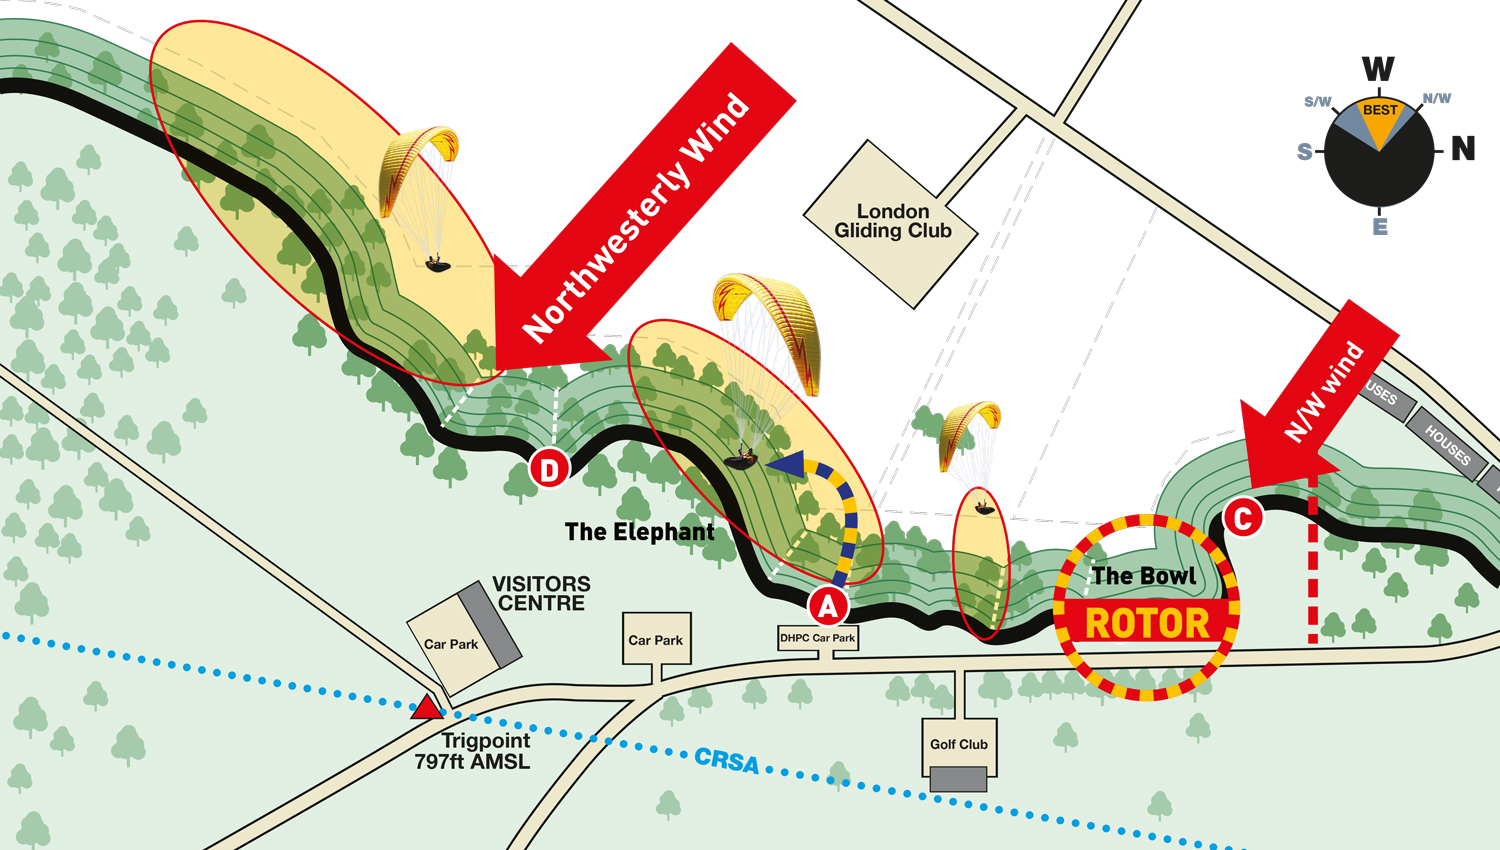
NORTHWEST WINDS: This is the most difficult wind direction especially for low airtime Red Ribbon pilots and you are advised NOT to fly in this wind direction. You are launching and turning left - flying away from a safe landing in the bottom landing field, and once you reach the 'Elephant' part of the hill, you will not make the bottom field from there, as you will be flying into a headwind and going down fast!
Remember, you are NOT allowed to bottom land in the Gliding Club field!
You MUST be able to confidently soar and top land the hill if you are going to fly in a Northwesterly. Once on the southern part of the ridge there are no bottom or slope landing options available.
NEVER take-off from the Southwest Launch or fly in the Bowl in a Northwesterly wind. You are flying in Rotor from the Pimple! Inexperienced pilots should not fly near this end of the hill, turn back towards the main paraglider launch before you reach the first gulley.
 Click on the image to enlarge
A Northwest Wind should NOT be flown by low airtime Red Ribbon pilots. There is no bottom or slope landing options over the 'Elephant' and beyond. You MUST be competent at soaring and top landing if flying in this wind direction!
If you are expecting to bottom land - DO NOT FLY THIS SITE IN A NORTHWESTERLY WIND!
These warning are by all means still current, statistics bear out these warnings. Every Spring there are crop of incidents caused by low airtime and sometimes more experienced pilots flying in unsuitable conditions through not accessing weather conditions correctly or not studying the site conditions.
Meteorology tells you that a thermal will continue to rise as long as it is warmer than the surrounding air. It will then cool and expand until its temperature equals that of the surrounding air. As the thermal temperature gets close to the surrounding air temperature, the thermal slows and stops rising. If the dewpoint temperature of the air is reached a Cumulus cloud will form, this is Cloudbase (see diagram below). If the dewpoint temperature is not reached then we have a 'Blue day' - rising thermals but no clouds forming.
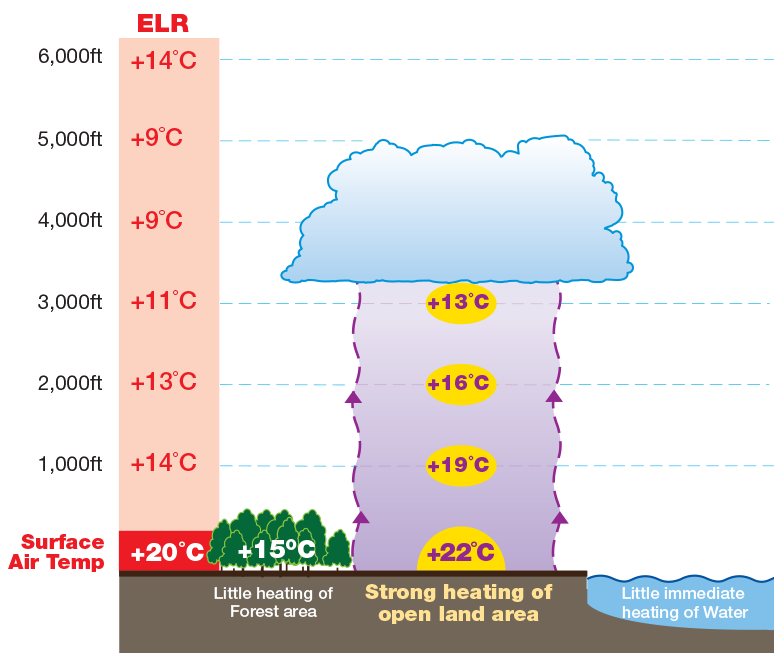
So… if the night time temperature is unseasonably cold and the day is forecast to be very hot especially with unbroken sunshine on the ground all day - expect very strong thermals!
The rising thermal (being warmer than the surface temperature) will now rise very quickly, as the surrounding air is much colder then the surface temperature, and will continue to rapidly rise until the downward force of the high pressure stable airmass forces it to slow and stop.
This will happen more often in spring and early summer when the wind has a Northerly track (NW-N-NE), the cold polar airmass coming down across the country combined with strong unbroken sunshine, make thermals rise very quickly from the ground.
These - I call… 'Danger Days' Experienced pilots know that with full sun on the ground that thermals will be coming up fast through the surrounding stable airmass, if there is strong solar heating of the thermal source and if the trigger temperature of thermals has been reached. This gives the opportunity to time your launch and gain height in these rising strong thermals.
Earlier, I called them Danger Days - Why?
Well just think about it for a minute and study the background meteorology.
- Spring can still give cold nightime temperatures and with the higher sun in the sky this can heat up the ground considerably to give air temperatures of 25˚C+. So, we have a large temperature difference between the cooler surrounding air and the rising thermal temperature. This makes the thermal just leaving the ground rise and accelerate very quickly!
- Add to this mixture the High Pressure stable airmass, which as you may know, the airmass of a high pressure system is always descending. This is why we have fewer clouds - the descending air warms as it sinks, drying out the moisture in the surrounding air, which inhibits cloud formation.
- So… we now have a rapidly rising unstable thermal combined with an opposite stable descending airmass. One airmass going up fast - one airmass coming down! Therefore, the boundary air layer between these two air-masses will be extremely turbulent and our thermal will get very rough at the edges. This can lead to tucking of the wing in this turbulence, which is particularly dangerous, especially if you are low down close to the hill, and active handling is required to cope with these conditions.
Even launching into these thermals requires correct timing, before the actual thermal hits the hill, as the boundary windspeed on launch can increase considerably. Once airborne this entails flying very low and close to the hill waiting for the approaching thermal to lift you up.
This is where the majority of inexperienced pilot accidents occur!
These seem to be the days that low airtime red ribbon pilots seem to flock to the hill, with little airtime gained over the previous months. The low windspeed and the sunshine encourage them to all turn up at the hill around midday, all expecting to fly!
Inexperienced low airtime pilots think this wind speed increase as the thermal arrives is normal background ridge lift wind and try to soar the hill, totally ignoring the thermal. These beginners consequently fly straight through both boundaries of our rough thermal and try to fly along the Ridge. Passing through both boundary layers of this rough thermal can cause major wing collapses and tucks - and as you are very low down and close to the ground there is little time for recovery.
Experienced pilots will always stay inside this thermal and gain enough height to combat any turbulence, they know there is no ridge lift and therefore not to stay low down too long. So - be warned, if you do choose to fly on these days…
Don't fly low and slow in these conditions!
Thermalling & Ridge Soaring conflicts
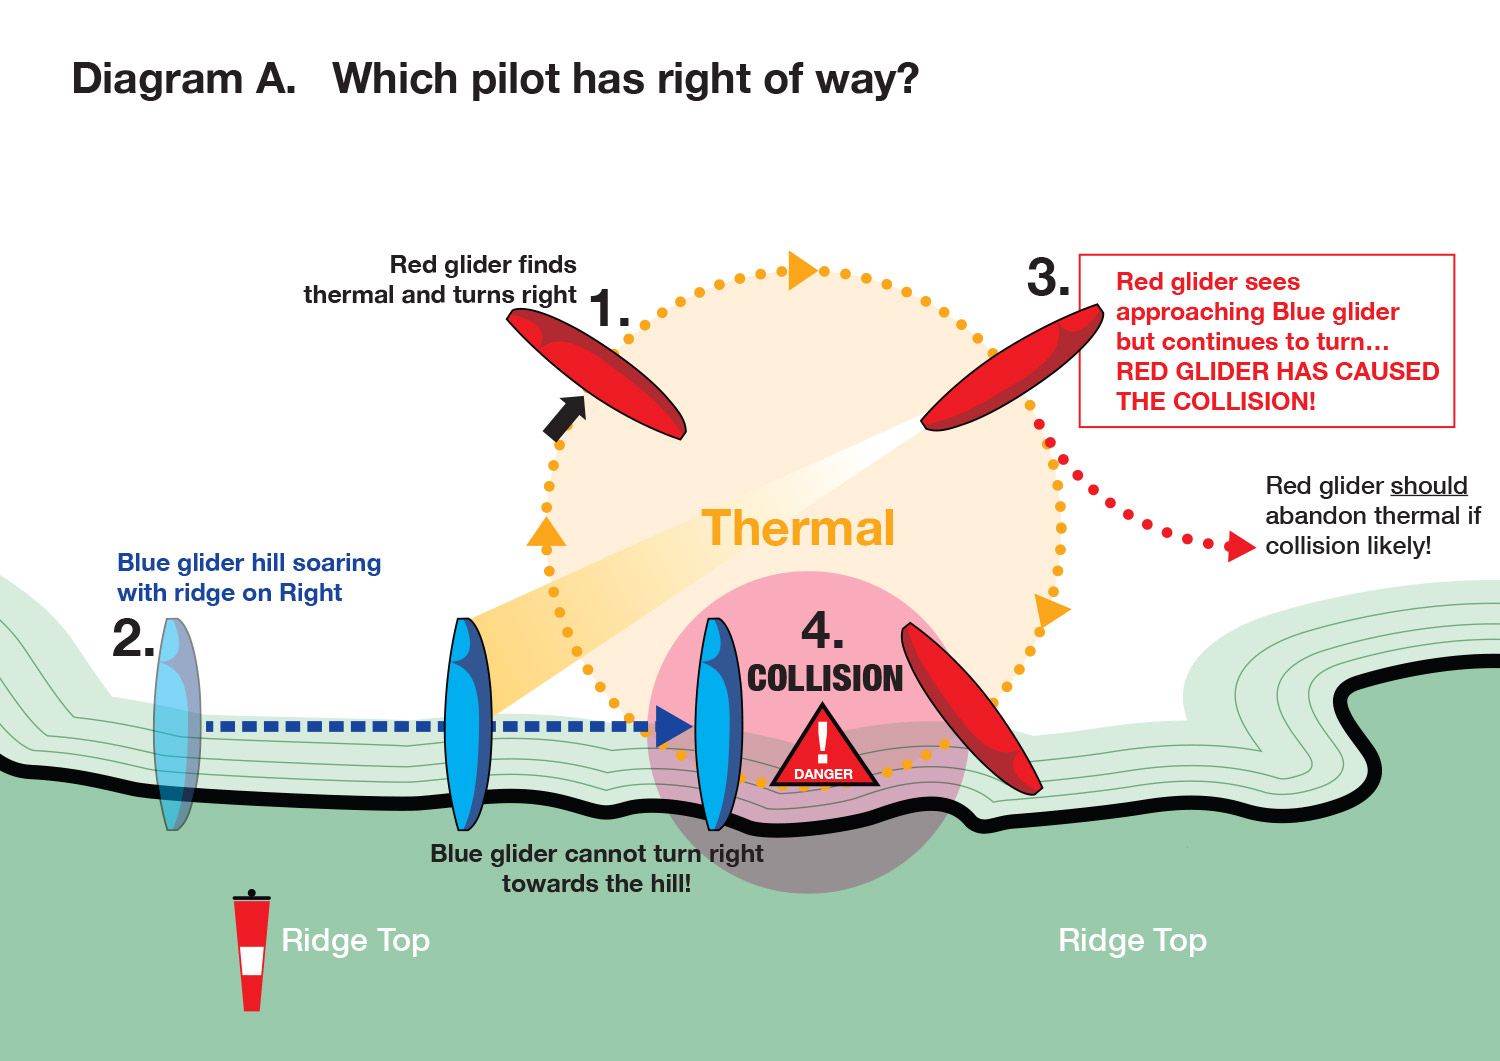
When ridge soaring, there is a simple rule that dictates the traffic flow – follow the ridge with the slope close on your right, return with the slope farther away to your left. This adheres to standard airlaw: when approaching an aircraft, avoid a collision by turning Right… now add a thermal to the mix!
There has been a mid-air collision on the ridge - both pilots involved thought they were adhering to airlaw.
However,…when someone begins thermaling right, close to the ridge, there are two rules that point against them: "the pilot to the right has right of way", and "the one with the ridge to his right has right of way."
Swinging onto the ridge and scattering the gliders who are ridge soaring (as the red pilot does) is very dangerous. Yet it happens because some pilots believe they have a right to thermal.
Where does this belief come from? It comes from a conflicting rule: "pilots joining a thermal must do so in the same direction as the established thermaling traffic". So a thermaling pilot does not expect anyone to fly into the space downwind of him.
A conflict in the rules is a precursor to an accident, so take note: this is a potentially dangerous situation! Let’s think this through.
What is an established thermal? I’d suggest it requires more than one full 360 degree turn. This gives other pilots enough time to perceive the pattern. If you cannot complete a full 360 degree turn in clear air, then do not begin to thermal. If you are at the same height as the ridge soaring traffic, you’ll do just as well in a steady ridge soaring beat.
The last thing an inexperienced soaring pilot needs is a another pilot flying in at high speed from the side, forcing an awful choice of banking right and colliding with the ridge or flying left into the middle of turning traffic. In crowded marginal conditions, it's best to avoid thermaling near the ridge and let the simpler pattern of ridge soaring traffic establish itself.
Next we will look at what both pilots should have done, this would have avoided the collision! It just takes each pilot to think about their flying in relation to other gliders.
What should you do?
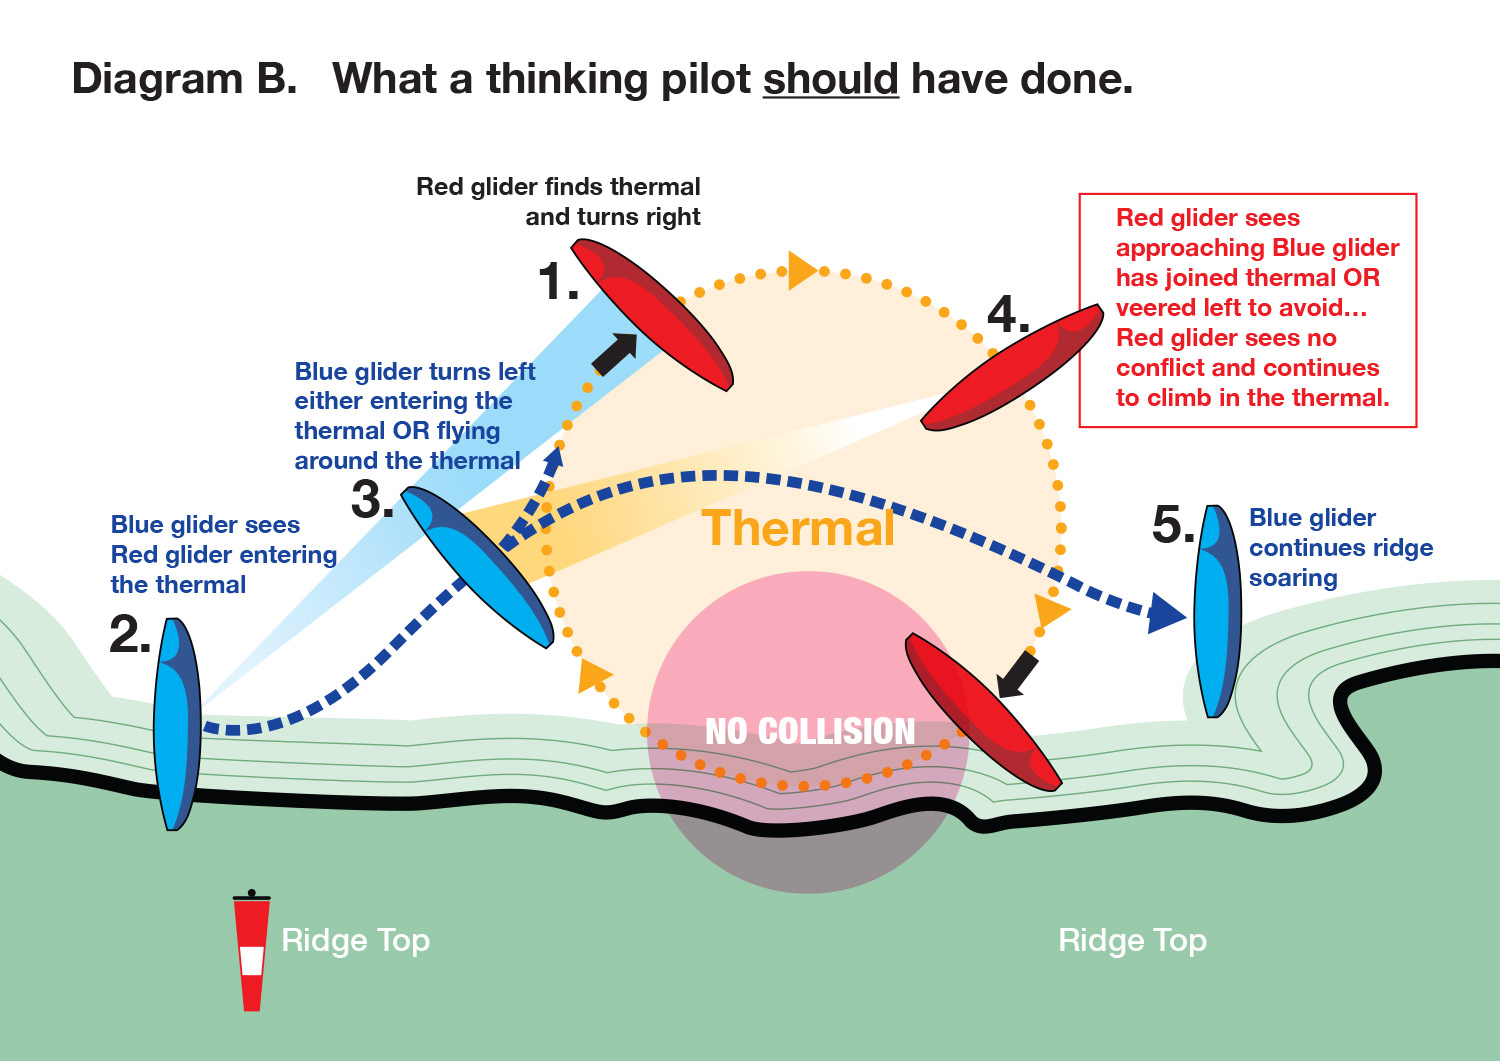
What a thinking pilot should have done…
In Diagram B both pilots could have helped prevent the collision.
Ridge Soaring Pilot: If you’re approaching circling pilots, you should alter your soaring path to feed into the direction of flow, which might mean veering off the ridge (left in Diagram B). This assumes an established thermal that has drifted onto the ridge, so you’ve had some time to notice the circling pilots. The established pattern means it’s unlikely there is any return traffic blocking this move out. If you choose to bypass this thermal, the left side is the best side to bypass it on. By looking ahead, you have put yourself in the best position, where you have the most options. Do NOT fly straight along the ridge, downwind of the circling gliders, in the narrowing gap between ridge and thermal, that's exactly what caused the collision in the first place!
Thermalling Pilot: It takes time and experience to be able to thermal, particularly close to the ridge, so you’re more likely to be the more experienced pilot, and should fly in a way that harmonises with the low airtime red ribbon pilots nearby. Check your blind spot for traffic that would be compromised by your turn. If a potential conflict situation occurs, abandon your dangerous right turn, and instead veer left and slot into a ridge soaring lane.
In the established thermal of Diagram B, as the thermaling pilot you must be very cautious as the thermal drifts into the soaring lanes. Remember, there is no clear right of way, there is a conflict of rules and you’re drifting into it. If in doubt, return to the thermal at a better moment, search further along the ridge or push further upwind before attempting to thermal. Remember, the CAA will always state the Rule:
It is the duty of the commander of an aircraft to take all possible measures to see that he does not collide with any other aircraft.